Working with the Zyxel NSA310
Contents
Serial console
Caution!
Check serial interface voltage before connecting, to avoid damaging your device (embedded devices typically operate at 3.3V opposed to PCs which operate at 12V). See also OpenWRT Serial Console.
Initially I tried to flash the device using the special USB upgrade key (usb_key_func.sh or parnerkey). I didn't succed, maybe because I didn't pay attention to NAS-Central's usb_key_func.sh page (or maybe because TDC firmware acts differently).
The device does however have four easy accessible pins for connecting to a TTL-serial port.
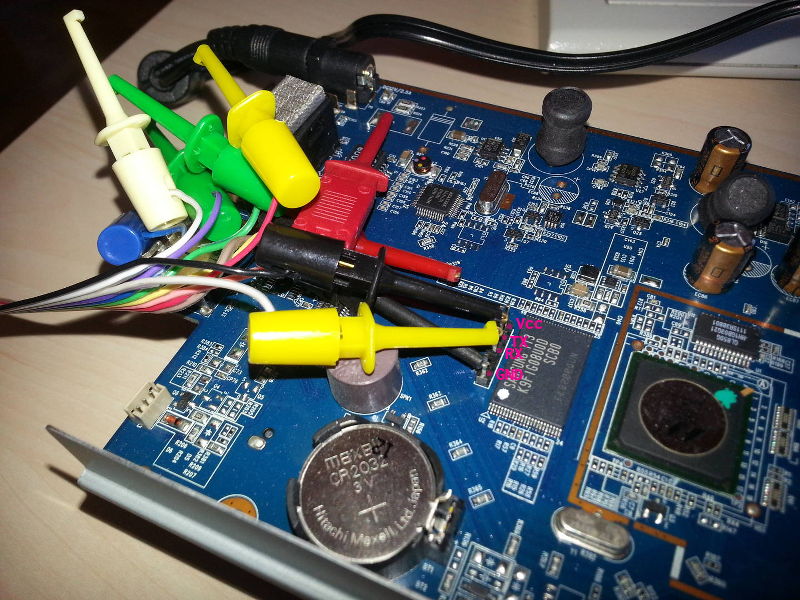
First I connect the serial adaptor's GND to board GND and RX to TX. I start the terminal on 115200 baud and powered on the device. If boot sequence starts to scroll by it validates pin correctness. Lastly connect adaptors TX to board RX.
Boot sequence
The boot sequence is divided into stages:
- U-Boot - loading kernel and rootfs, supplies the flash mapping
- Stage 1 - setup system and device drivers
- Stage 2 - checkup on sysdisk image
- Stage 3 - boot from sysdisk image
U-Boot can be interrupted for altering boot parameters, loading images from usb, or flashing.
After passing control to the kernel the console becomes very noisy: console-during-boot.txt. One snippet to watch out for is TDC Style Detected:
[1206] is disconnected
TDC Style Detected, overwrite admin's password
[1379] server write-only FIFO is opened (fd=6)
[1379] server read-only FIFO is opened (fd=7)
[1379] server error read-only FIFO is opened (fd=8)
argc = 6,  func = 190
argid[1]: 363; argv[1]: password
argid[2]: 616; argv[2]: modify
argid[3]: 1122; argv[3]: "admin"
argid[4]: 1144; argv[4]: "M718A7eh"
argid[5]: 1143; argv[5]: RaidLing
After argv[4] the root password for the HomeDisk is displayed, which is unique per device.
Boot using Debian install image
Interrupt normal boot by pressing any key during U-boot.
Load images from USB and boot:
usb start
fatload usb 0 0x800000 uImage
fatload usb 0 0xb00000 initrd.gz
setenv bootargs 'console=ttyS0,115200 root=/dev/ram initrd=0xb00000,0x900000 ramdisk=32768'
bootm 0x800000
Once inside the Debian installation, you can execute a live shell.
Flashing using Upgrade-Key
Prepare a FAT formatted USB key with force_flash.zip.
Add Zyxel firmware binary to the USB key - rename it to ras.bin.
Boot the device in TDC mode and log in with the recovered password.
Insert the USB key, determine the mount point, and add a symlink:
USB=`mount | sed -n '/e-data/{s/.*sdb1 on \([^ ]*\) .*/\1/;p;}'`
ln -s $USB /mnt/parnerkey
Execute the upgrade script:
cd /mnt/parnerkey
sh usb_key_func.sh.2
The flashing will begin and the device will power down afterwards. When rebooted "stage 2" will overwrite the sysdisk image on the harddrive and reboot once more.
When the system finally comes up, reset the password with the button next to the DC plug. You should not be able to log in with default credentials: admin and 1234.
The upgrade script have renamed ras.bin to ras.bin.processed.
Flashing from U-Boot
Should the device refuse to boot or the TDC Style Password not work, the device can be flashed from the bootloader.
Flash layout
mtd Offset Length Symbol 0 0x0000000 0x0100000 uboot 1 0x0100000 0x0080000 uboot_env 2 0x0180000 0x0080000 key_store 3 0x0200000 0x0080000 info 4 0x0280000 0x0A00000 etc 5 0x0C80000 0x0A00000 kernel_1 6 0x1680000 0x2FC0000 rootfs1 7 0x4640000 0x0A00000 kernel_2 8 0x5040000 0x2FC0000 rootfs2 9 0x8000000
kernel_1 needs to be flashed with DATA_1000. rootfs1 needs to be flashed with DATA_1004.yaffs2 which might be generated from DATA_1004. DATA_1000 and DATA_1004 files are produced by usb_key_func.sh.2 during the Upgrade-Key flash procedure:
/sbin/bin2ram little ras.bin /mnt/ram2/tlv.bin
/sbin/fw_unpack -C /mnt/ram1 -i /mnt/ram2/tlv.bin
ls -l /mnt/ram1/DATA_1000 /mnt/ram1/DATA_1004
NAS-Central has ARM versions of the tools bin2ram and fw_unpack, it may be necessary to do the extraction on the NSA310 itself.
I do not recall how to produce the DATA_1004.yaffs2, but during the Upgrade-Key procedure rootfs1 is written by:
/sbin/flash_eraseall /dev/mtd6
/bin/mount -t yaffs2 -o rw /dev/mtdblock6 /zyxel/mnt/nand2 > /dev/null 2>&1
/bin/cp /mnt/ram1/DATA_1004 /zyxel/mnt/nand2/sysdisk.img.gz
Caution!
Bootloader flasher does not perform consistency checks. It will write all zeroes if told to do so. Below are MD5 sums I used:
46013b126ae6c426109b809831bd0de6  DATA_1000 NSA310_4.61(AFK0)C0.zip
18646edf793a84690fccb39eb697aabf  DATA_1004 NSA310_4.61(AFK0)C0.zip
3b742b712042630f60db875486896570  DATA_1004.yaffs2
Put DATA_1000 and DATA_1004.yaffs2 on a FAT usb key.
Press any key when presented with U-Boot ascii art. Insert the key and start usb subsystem:
usb start
Load the kernel image and write to mtd slot 5:
fatload usb 0 0x800000 DATA_1000
5695220 bytes read
iminfo 0x800000
nand erase 0x0C80000 0x0A00000
nand write.e 0x800000 0x0C80000 0x0A00000

Writing data at 0x167f800 -- 100% complete.
 10485760 bytes written: OK
Load rootfs image and write to mtd slot 6. Since rootfs should be in flash file system format, the special write command write.jffs2 is used:
fatload usb 0 0x800000 DATA_1004.yaffs2
40463808 bytes read
nand erase 0x1680000 0x2FC0000
nand write.jffs2 0x800000 0x1680000 0x2FC0000

NAND write: device 0 offset 0x1680000, size 0x2fc0000

Writing data at 0x463f800 -- 100% complete.
 50069504 bytes written: OK
The original firmware will still be present in slot two. You should inspect currently active boot slot with printenv.
Correcting model number
The TDC Homedisk is programmed with a model number (DA01) different from the original Zyxel NSA310 devices (A203). This causes firmware upgrades to fail later on.
The model is easily changed in uBoot:
setenv model A203
saveenv